Wednesday, November 27, 2013

Bargain Shopping for a Dining Set

Happy (almost) Thanksgiving!

I have spent almost every Thanksgiving holiday at a friend's house the last few years, so unlike a lot of other bloggers, I don't really get to blog about Thanksgiving menus or table setting, since I am not making a feast or having anyone come over to my place. But I can contribute to those of you putting together a shopping list for this weekend!

Black Friday and pretty much all of Black Weekend, can be the perfect time to get a great deal on a big ticket item. But recently a lot of stores have been offering some sweet deals prior to the holiday weekend and other stores have been bamboozling you into thinking you will be getting a great deal this weekend. Recently, I have been shopping around for a dining set for my boyfriend's apartment. He's had this $99 cheap wood dining set from Ikea for the last few years and 3 out of the 4 chairs that it came with have broken, and the table is 2 dinners away from collapsing. So I have been helping him and his roommate bargain shop for a top quality dining set under $500. Did I mention they wanted a solid wood table and chairs?

After looking thru stores and websites like World Market, Pottery Barn, Pier 1, Target, Overstock, etc etc. The best deal I found was a wooden table at World Market for $275. However, that did not include shipping or the $100 big item fee. So with everything added up, we were looking at around $350. Not bad, but not great either. World Market has some great stuff for a great price, but I have learned that the quality of their products isn't meant to last for a very long time. I bought a couch from there 3 years ago that already needs to be replaced big time. The foam in the seat cushions is completely worn out and cannot be replaced either. So I am a bit skeptical on the quality of their furniture.

This table was no exception, and we decided that we would pass on the table and wait to see if we found a better bargain.

Fast forward 2 months and we decided to go to the Crate & Barrel Outlet in Alexandria, VA. When we got there, we found out that the store was having a huge dining set sale. All tables were $299 and all chairs $40. Until December 1st 2013. That's right, you can still shop this sale. Say what!!? Yea, we were on that like crazy people scanning the whole store for the perfect table. Unfortunately, we did not see one we liked or that was in good enough condition to take home. So I decided I would stop by again in a few days during my lunch break to see what new tables they had in stock. I was in luck. I found a table in near perfect condition, that originally sells for $599, for only $299. And it is gorgeous!
Basque table in honey
This table is gorgeous, sturdy and built to last a lifetime of holiday parties, family gatherings and friendly suppers. And the best part is that it fit into my Suzuki hatchback. No need for any shipping fees! We also found 3 mismatched dining chairs for $40 each that we thought would look great with the table. We got chairs in silver, black and white, each one retailing for $200 and each in near perfect condition. We all really like the mismatched colors and styles because it gives it a modern and laid back look that fits in well with their CB2 Ostrich Painting in the background.


So in total, they spent $420 plus tax on their dining set. They are still looking to add a few more chairs for $40 and we are hoping that this Black Friday the store will have a strong selection of chairs. I don't think you can get any better deals than this when it comes to top quality wood dining sets. If you are in the market for a dining set for the upcoming holiday season, check out the Crate & Barrel Outlet nearest you! I just wish I had this dining set for myself.... :)


Thursday, November 14, 2013

Weeknight Quesadillas

My work weeks are very hectic and long and I usually do not have the time or energy to cook dinner. So I have been doing a lot of cooking during the weekends and eating leftovers during the week. But on those days when you are truly sick and tired of eating the same leftovers what can you do?

Well, I have been making quesadillas with food that is easy to find in your fridge and pantry! It is so easy and quick and delicious too.

Here's what you'll need:

1lbs of chicken breast
1-2 avocados or your favorite store bought guacamole
Your favorite salsa (I like the fresh made salsas from Trader Joe's and Whole Foods)
1 red onion
1 packet of large tortillas (any brand works and flavor works. I usually stick to "originals")
1 red bell pepper
1 can of black beans
sour cream
cilantro
1 packet of cheddar cheese or whatever cheese you like

Directions:
Cut the chicken into small pieces and cook on a heated pan (medium heat) with some olive oil and season with salt and pepper. Chop the bell pepper and onion and add to the chicken and cook until tender and chicken is done. Remove the pan from the heat and let cool. Open the can of beans and drain completely. Take a large frying pan (you can use a panini style press if you have one) and drizzle a little bit of olive oil on it. Place a tortilla on the pan and fill it with the chicken, pepper and onion mixture. Make sure you spread the chicken around the tortilla evenly. Then scatter a spoonful of black beans over the chicken, sprinkle some cheese and place another tortilla on top. Heat the tortilla on the pan in medium-high heat until the tortilla at the bottom is heated thru and you can see a little bit of a sear. Then carefully, with a large spatula, flip the quesadilla over. This can be hard to do if you're like me and overstuff your quesadilla. So you could take another frying pan or a large plate that is the same size as the one you are using and flip the pan of the quesadilla over the other pan/plate. Heat the pan up and sear the other side of the quesadilla. The cheese should be melted throughout once done.

Remove from the heat, let cool, and flip or slide on a cutting board or a plate. Use a pizza cutter to cut the quesadilla, serve on a plate with a side of salsa, guacamole (or sliced avocado), sour cream and garnish with some cilantro. They might not look perfect, but they are delicious and quick and easy to make. You will have left overs for lunch or dinner the next day too!


Wednesday, October 23, 2013

Fish en Papillote

Well hello there,

I have abandoned the blog.

I am sorry.

It has been a crazy few months around here, between working 12hr days, government shutdowns, and looking for a less hectic job I have hardly had any time to blog =(. But I am hoping to at least make some time to do a weekly post until things get a bit more regular around here.

So for my comeback post, I am going to introduce you to Fish en Papillote. Which in my lingo, it means wrapping a fish in parchment paper and sticking it in the oven. Voila!


Pretty fancy looking huh? 

But would you believe me if i told you it only took 20min total to make?

You betta' believe it!

Here is what you'll need:

4 fillets of mild flavor fish. I like to use Sole or Tilapia.
2 zucchinis
1 bell pepper
1-2 carrots, depending on size
1 lemon
a bunch of cilantro
1/2 of a red onion
salt and pepper
1/4 of ginger root
4 garlic cloves
olive oil
parchment paper and string
1 bag of "seeds of change" quinoa and brown rice microwavable pouch

Directions:

Preheat the oven to 350. Slice the onion and pepper into long strips. Then grab a potato peeler and slice the zucchini and carrot. Mince the garlic, chop some cilantro and grate the ginger root. Set those aside and grab the fish and season it with a little bit of salt and pepper. Grab some parchment paper, drip a little bit of olive oil down the middle and place the fish. Then top it off with a bunch of the shredded/sliced/minced vegetables and 2 lemon slices. Drizzle some olive oil. Then make a little pouch with the paper and fold it close at the top. Tie into place at the ends with baker's string. Follow the same directions for the 3 remaining fillets. I eyeball to see how much of each ingredient i can put in each pouch, but i try to even it out so that all 4 fillets have a similar ratio. 


Place the fish on a baking sheet and place in the oven for 10min or so, depending on your oven. Take out of the oven and let sit for a minute or 2 so that the paper cools a little bit. In the meantime, take the pouch of quinoa and rice, cut a small opening and place in the microwave for 90 seconds (follow the instructions on the pouch). Once that is ready, serve on a plate with a fish papillote.

Be careful when you open the pouch of fish, there may be some steam that comes out and you do not want to burn yourself. I like using a mild flavored fish since it brings out the flavor of all the other vegetables, but you are welcome to try any other fish. 

Enjoy! 


I really love the quinoa and rice from Seeds of Change. It is delicious, healthy and super easy to make. For an even better deal, head out to Costco, where you can buy a box with 6 pouches for half the price of your local grocery store. And don't forget, you can buy a bottle of sparkling water at Trader Joe's for $.79! And some local (and cheap) white wines as well =) 


Wednesday, September 11, 2013

Easy Meatballs with Homemade Truffle Fries

I have mentioned before how I am currently living computerless since my 7+yr old Macbook decided to die.. and that has negatively affected the frequency of my posts. What I haven't mentioned is that I also work 12hr days, and some weekends too, so I haven't had much time to do anything that I enjoy, much less try to find a new computer.

But the thing is, I know I am not the only person in this country who is working such long hours every day. Not because I necessarily LOVE my job, but rather out of necessity. I haven't had much time to see friends, take a weekend breather, go on vacation. It makes me sad, it really does, but I feel fortunate to at least have a job, regardless of how I feel about the work or the fact that it doesn't help further my career goals. It doesn't pay much, and I do live paycheck to paycheck, but it has so far paid the bills, and that is what matters most, right?

So with the tight budget and the long hours I have been trying to come up with ways to make the most of my free time and make that time feel like a vacation. That's where this meatball and fries recipe comes in. It is super quick and easy to make. God knows the last thing I want to do after 12hrs of work is make an elaborate meal.. or spend a bunch of money eating out. And the cute baskets and lining paper make it feel like I just went out to eat at a ballpark or something, but instead I am watching the Packers get crushed by the 49ers at home. Disclosure: I am a huge Packer fan while my boyfriend is a 49ers fan. Football season certainly tests our relationship!

So here we go!

Ingredients for Clay Matthews (meat)Balls 
(anyone see that tackle on Kaepernick? out of line but dang, the man is a beast)
1lbs of ground beef
4 garlic cloves
1 roasted red pepper
a bundle of parsley
salt and pepper to taste
1/2 cup of bread crumbs

I mixed the garlic, peppers, salt and pepper and parsley in a food processor until finely chopped. I then put the meat in a mixing bowl and poured the ingredients from the processor in and mixed it all by hand  while slowly pouring in the breadcrumbs. I sometimes add a little more breadcrumbs, depending on how hearty I want the meatballs. I also had some of the garlic and pepper mix left over for another batch of meatballs, so this is perfect if you are cooking for more than 4 people.


Once all of the ingredients are mixed well together, I formed medium sized balls and placed them on a lightly greased baking pan. I then placed the pan in the oven at 400 degrees for 20 minutes. After 20 minutes I took the pan out and flipped the meatballs over and baked them again for 20 more minutes. Once done, I let cool.

For the fries
2 russet potatoes, finely sliced
1/4 of a yellow onion, finely sliced
a cup of mushrooms (any type you like, i used baby bella)
a drizzle of olive oil
salt and pepper to taste
a drizzle of truffle oil
rosemary

I sliced the potatoes, onion and mushroom thinly. I then tossed them in a bowl with sea salt, pepper and olive oil and sprinkled some rosemary from my garden on them and placed them on a slightly greased baking sheet. I put them in the oven for 400 degrees for about 45min. I then turned the broiler on and let them cook until golden brown (about 15min or so). Once they were done, I drizzled some truffle oil on them and let cool.


I served them on a plastic basket and liner I bought at Sur La Table on clearance. The baskets were $1 and the liner was $3 for a packet of 40 or so. I also drizzled some ketchup on them as well. These weren't the very best meatballs I have ever made but they were the best meatballs to eat with french fries I have ever had. The other meatballs I make are perfect for hoagies. These meatballs work better on their own and with a simple carb on the side. Now that football season is here, I will be eating lots of meatballs with fries and drinking some fall beers. 

Let's hope my fantasy teams don't crash and burn this season.. 

Monday, August 26, 2013

A Little Rant About Weather

I have a dead computer =(

It's kept me from blogging because honestly, I find it uncomfortable to blog from a public computer in my apartment building. Mostly because I don't want my neighbors creeping up behind me reading as I type. Is that weird? I am sorry for the lack of posts this past month, hopefully I can get on top of things quickly!

But with that straightened out, let me just throw this out there...

This summer's weather sucked. It sucked so much that I don't feel the same level of gratification over my garden as I did last season. Even though I took much better care of it this season, even beating out an aphid infestation and disease, this weather just sucked. And it still sucks.

What's the deal with that!?

Some people think I am crazy and that this summer has been similar to recent summers, but i'm telling you, it's not. And as my boyfriend says, "you're always right", I know i'm right when I say this..

It sucked and still sucks.

Look, I have some evidence to back this up. And I blame the weather for my somewhat lackluster gardening season. For example, by this time last year I was enjoying numerous banana peppers, bell peppers and jalapenos. This season all I've enjoyed is a frankenpepper from hell. The only thing that has done well so far is the patio tomato. Even the mint isn't as robust as last year, the oregano went meh, the lemon tree is still just chillin with some green lemons and the blackberry is just off on its own doing its thing and growing like a giant bean stalk to nowhere.

Frankenpepper
In fact, the humidity has been so bad in the area, that I have had mushrooms growing in my containers. I've never had shrooms, and I keep the containers well drained. But it has been impossible to keep the shrooms from growing all over and as harmless as some people say they are, every time I saw shrooms in the container, the plants did not do well. I've been spraying my plants once a week with the anti-fungal spray because the disease, although it is under control, it is still around. And so, I blame this lame summer weather of high humidity, little sun, and moderate temperatures for a very slow and somewhat crappy growing season.

I'm not a gardening expert by any means, but my garden certainly did better in the record triple digit heat of last season than it has done in the mild temps and ridiculous humidity of this season. Freakin' mid-atlantic weather.

I don't know if it is global warming, aliens, the apocalypse or my imagination, but whatever it is, it is ruining my yield for this season and i'm not happy about it.

Ok, rant over. Anyone else ranting about the weather this year?

PS. While my garden has struggled, the local orchards seem to be doing just fine. Just look at all these peaches and blackberries I picked up a couple of weeks ago! I am officially annoyed and jealous.

I froze most of these so I could enjoy them in smoothies and what not throughout the coming months. I have been contemplating buying a chest freezer so I can freeze all sorts of veggies and fruits for this upcoming winter. Anyone have one of those? does it really hike up your energy bill? 

I think I need to remind myself that I live in an apartment in DC and not on a farm... a chest freezer might not be the right investment at this point in time. 


Monday, August 5, 2013

Honey Lemon Glaze Chicken

So as you can see, I am obviously still having computer issues and struggling to upload new posts to the blog on a regular basis =( but hopefully in the coming months I will be able to replace my computer! In the meantime, bare with me, I will be borrowing computers every weekend so that I can upload new posts as well as facebook troll and check emails.

For today, I have an easy honey lemon glaze chicken recipe. The flavor is mild and a little sweet, but it is simple and delicious. It is from my favorite cookbook La Tartine Gourmande.

Ingredients

Juice of 1 lemon
2 tbsp of honey
1 tbsp of chopped oregano
3 garlic cloves, minced
1/4 cup of olive oil
sea salt and pepper
8 chicken drumsticks
4 green zebra tomatoes
1/4 cup of unpitted kalamata olives
1/4 cup cold water
1 tbsp chopped parsley
4 chopped potatoes
2 corns cut in half

Directions

Mix the lemon juice, honey, oregano, garlic and oil in a bowl. Season with salt and pepper. Arrange the chicken in an oven dish and coat with the sauce. I marinated the chicken for a few hours in this sauce for extra flavor! Preheat the oven to 375 and add the tomatoes (quartered), olives, and 1/4 cup of the water to the chicken and bake for 50 minutes or until golden brown.

Take the potatoes and cook them in a pot with boiling water and a little bit of salt until done. Also place the corn in a pot of boiling water and cook until the kernels are soft and have a little bit more color to them. If you leave them cooking for too long, they will get too crunchy. 


When the chicken is done, allow to cool, and serve with the potatoes and corn. Add the parsley to the chicken. I like to use the extra sauce from the chicken to drip over the potatoes for some flavor. 


I had lots of left overs for the next couple of nights and it re-heated well. This is a quick and easy recipe to make during the work week. You can also slice up some french bread to dip in the sauce with your meal, yum!

Monday, July 29, 2013

Mid-Summer Garden Update

Hey guys!

So it's been a while since I've written a post.. so sorry about that! My 7+yr old Macbook is finally on it's last leg and it has made blogging, emailing, facebook stalking, and pinterest drooling impossible. But I have finally managed to get it to somewhat work for a quick post! (I am pretty sure this quick post will take me an hr to load/type at the rate this is going).

I have to say, 7+yrs with a laptop is pretty good, right? Someday I will be able to afford a new Macbook, but for now I hope this thing gets me thru at least a few more months. I started out as a PC user, I've had Compaq (remember those! haha man I am old), Toshiba, Vaio, Dell, HP, and not a single one of those lasted me more than 2 yrs. This Macbook though, has made it for so long that I don't think I could ever go back to PC. Although the new Windows tablets do look much more intriguing (and budget friendly) than the iPad of even a Macbook.

Anyway, enough about that, let me give you a quick garden update!

Remember this?! This is my blackberry plant! It used to be just a wooden stick growing out of a pot (that stick broke btw) and now look at it! It is almost as tall as I am! Which brings me to a quick question, how tall are these supposed to get? And how long until I get some blackberries over here!


In my last post I talked about how I was growing these frankenpeppers and how I was praying that they were sweet peppers given I already had too many hot peppers growing thanks to Merrifield's crappy labeling system... well... they are not. And I found out the hard way. These things are freaking hot. I could not feel my lips or my tongue for a good half hour. Anyone want a shipment of super hot peppers? I am guessing these are anaheims? FML


And this right here.. well.. on the far right is my container lemon tree. Totally worth the investment! I have a good 6 lemons growing and the plant is still blooming. Bring it on lemon tree! Right next to that is my Patio tomato plant. That plant is worth every penny, I have had so many tomatoes come from that, despite the fact that it is still battling some disease from earlier this summer, it has held up pretty well. And right next to that.. guess what that freakishly huge plant is.. It is a pepper plant! Isn't that ridunkulous? That plant is taller than my blackberry plant. And it is dropping a motherload of peppers. It is supposed to be a Giant Marconia pepper plant.. we will see if that's what it really ends up being or not.


You may have noticed these giant bamboo sticks coming out of some of my pots. I got these sticks at Home Depot to help support my plants, including my tomatoes. The cages are too cumbersome for a balcony garden so I opted for these sticks. I got a pack of 6 for $2. Crazy cheap considering one plastic stick costs you a little over $2. I just used some twine to tie the plants to the bamboo and voila! It made a huge difference and I will probably buy more as the plants continue to grow. Thanks for selling such a great deal Home Depot! Speaking of great deals, they are currently having some of their flowers on sale! I bought some new mums to replace my older ones that were badly injured during the disease and aphids infestation from earlier this summer. 

I got some new recipes and projects to blog about so hopefully this laptop makes it long enough so I can add some new posts more regularly! Otherwise, can I get an early christmas present? hahaha


Wednesday, July 17, 2013

Frankenpeppers?

So this year I think I may have bought a plant of Frankenpeppers. When I went to the Merrifield nursery in VA a few months ago to buy my pepper plants I bought two banana pepper plants.. at least that's what the label said. Fast forward a few months and I have this giant pepper growing that does not look like a banana pepper at all.

Can anyone guess what kind of pepper this is? My guess is an anaheim pepper. I am seriously hoping it is something sweet because we just found out one of our Cubanelle pepper plants is a spicy one.. thanks to yet another mislabeled pot.


So here it is, my 6+ inch long frankenpepper. Has anyone had issues with buying mislabeled pepper pots before? I've been thinking that because 3 of my pepper plants are not what they were advertised to be, that I will return to Merrifield and ask for some sort of store credit for the next growing season or something. How have you guys resolved similar issues? 


I am happy to say though, that after struggling with some disease/mold/aphids this season, my plants are growing like crazy and are very healthy. Just check out my lemons! The container lemon tree is doing great, so the $60 investment seems like it will pay off. I don't think I will get $60 worth of lemons just yet, so far there are 6 lemons growing on the plant. But the tree just bloomed like crazy again and I was told that if I bring the plant indoors during the winter, it will continue to produce lemons. So we will see what the total lemon count is for this year.


The tomato plants have been a hit and miss. The San Marzano tomatoes are not container friendly. They are a tomato plant best left for actual gardens and not balcony gardens. The patio tomato though, has been dropping tomatoes like crazy. I've already eaten two and I have another one ready for picking and 7 more still growing. Next season I will invest in Patio tomato plants rather than something like a San Marzano. It grows best on my balcony and the yield is worth the investment. 


Here are my Habanero and Spicy Cubanelle pepper plants. These aren't as big as my other pepper plants because I bought these not too long ago thinking I would have to replace my garden beds because of disease and aphids. I just picked the Habanero and had it with my spicy spaghetti recipe. I also used some of my lemon thyme and tomatoes for this. So yummy! I can taste the difference when I make this recipe using homegrown ingredients versus store bought. I can't wait until the lemons are ready and I can add those to this recipe! 


I will keep dreaming of the day when I can afford to buy a home with a huge yard just so I can plan a zillion different types of vegetables and fruits. Or maybe I should change careers and become a farmer? That would sure beat dealing with Washington bureaucracy! hahaha.

Monday, July 15, 2013

Burlap and Lace Placemats

I've also been wanting to update the furniture/decor in my apartment for some time now from the old mismatched college stuff to a more adult cohesive style. Pinterest has been very instrumental in helping me decide what style I want to embrace in my apartment. After much deliberating, I have concluded that I am too scattered brain and indecisive to just pick one style.. and that I should probably just keep all of my mismatched college stuff until I get married.. or move in with someone.. or both?

I decided to tackle one little section/room at a time since I don't have a budget for everything. This way I feel less pressured to pick a style just yet. And the first thing I've been focusing on is my kitchen and dining area. I really like the farmhouse style for the dining area with a small modern twist. I would love to buy a wooden dining table, but for now, my metal/glass ikea one will have to do. I can still bring that farmhouse vibe to the dining room with some small and simple touches. That's where the placemats come in.

I've been searching for some cute shabby chic placemats and it's been hard to find ones I am in love with. So I decided to make my own. I went to Michael's and bought a roll of burlap that is 10ft long and meant to be used as a table runner. It was $12.99 for the roll. I also bought a roll of white lace trim for $2 (I used some coupons). But of course, I didn't have enough lace so I had to go back for more.

You will need:
Burlap
Lace trim
Scissors
Hot glue gun
A placemat for sizing purposes
Elmer's glue

So here's what I did.

  1. I took a placemat to measure the right size for the placemats. Thankfully, the burlap roll is the perfect width for a placemat. So I only had to make one cut to make them the right size.
  2. Use a sharp scissor to cut! It will make cutting burlap so much easier. Cut along the line (I used a pencil to mark the spot). You will see that the burlap will want to fray and come apart a little bit. I let it fray a tiny bit, and then with some Elmer's glue sealed the edges to prevent further fraying.
  3. Cut the lace to the right size so that it goes around the edges of the burlap. 
  4. Carefully line the lace with some hot glue and glue to the placemat along the edge. 
  5. Push the lace down with something so that you don't burn your fingers
  6. Let dry and voila!

It was pretty easy to make the placemats. They aren't as sturdy as ones you could buy at the store, but they are sturdy enough to use as decor for a dinner party or something. I will definitely be using these when I have guests over for dinner/lunch. 


The centerpiece is an arrangement of faux flowers I got on clearance at Bed Bath and Beyond for $8. They came attached to a brown base that I didn't like so I cut them off and put them in a small glass container. The little white lanterns are also from BBB and they too are on clearance for $5.99! They come with little light up candles too! The centerpiece and the lantern really help tie in the shabby chic/farmhouse look to the table. I can't wait until the day comes when I can afford a new dining table =). 

Sunday, July 7, 2013

Southwest Flank Steak Salad

This weekend I tried out a new recipe I sort of made up on my own. And it was a huge hit.

::victory lap::

Phew! I was worried that after spending a pretty penny on a piece of flank steak it was going to turn out not so yummy. But thankfully, it was a delicious meal with plenty of left overs! I love left overs, means less cooking and cleaning during the week and good lunches to take to work too, which saves me lots of money each month. Think about it, here in DC the food trucks are everywhere (and a lot of them are delicious too), but each meal costs you about $10. Do that for every lunch and you are easily spending $50 a week and $200 a month! That's a lot!

I am often too tired after work to cook elaborate meals, especially after coming back from the gym. But the time spent making one big meal with lots of left overs is worth the amount of money I could potentially save up each month. I'm always looking for new recipes for lunch leftovers and I have been seeing a lot of Pinterest pics for a Southwest type salad. A lot of them look delicious, but once I would read the ingredients I was quickly disappointed at how few ingredients there were or how bland the dressing and steak seasoning was. So I decided to make up my own steak salad and search for a salad dressing with great reviews. That's when I found the recipe for the Cheesecake Factory's Santa Fe salad dressing. It had great reviews, the ingredients were easy to find and the prep time was quick. Best of all, it was the perfect choice for the salad and steak.

So here we go, the ingredients and directions for how to make my version of a Southwest Flank Steak Salad.

Ingredients for the salad and steak (makes enough for 4-6 people)

  • 4 corns on the cob
  • 2 bell peppers (I used red and green)
  • 1 can of black beans (drained)
  • 1 cup of shredded carrots
  • 1 bunch of scallions (diced)
  • half a red onion (diced)
  • 1-2 heads of iceberg lettuce
  • 1-2 packets of spinach and romaine lettuce 
  • 1 lbs of flank steak (you can use any type of steak, but flank has less fat than skirt steak and is cheaper than tenderloin, I spent $14 for the lb at Whole Foods but check out Costco or other stores for better deals)
  • 1 bottle of Stubb's Texas Steakhouse meat marinade (I used maybe a quarter of the bottle)
  • 1 avocado
  • 1 small container of cherry tomatoes, halved
Directions
  • Place the steak in a zip lock bag and pour some of the Stubb's marinade to coat the steak. Let it marinade in the fridge overnight or for a few hours. 30 min minimum. 
  • Rinse and chop up all the vegetables (except the corn and peppers) into bite size pieces and put them in a bowl. 
  • Add the shredded carrots and the well drained black beans into the bowl. 
  • Add as much lettuce as you want, I added about 2 heads of iceberg lettuce mixed with 1 large basket size packet of spinach and romaine lettuce. 
  • Cut the peppers in half, seeded.
  • Rub olive oil, salt and black pepper all over each corn until well coated.
  • Take the peppers and the corn to the grill and cook until done. Make sure to turn them to each side for an even cook
  • Once the peppers and corn are done, cut the peppers into bite size pieces and with a knife, cut the corn from the cob. Add them to the salad bowl. 
  • Grill the steak on med-high and turn on each side for a few minutes until cooked. I cooked mine medium to medium well. About 5 minutes on each side, depending on your grill. Slice the meat into pieces and add to the salad
For the dressing
  • 3 cloves of garlic
  • 1tbsp minced fresh ginger
  • 1 big bunch of cilantro (most of stalk ends chopped off)
  • 1/2 cup of fresh lime juice
  • 1 1/2 tsp of wine vinegar
  • 1/2 tsp of cumin
  • 3/4 tsp of salt
  • 1/2 tsp ground pepper
  • 1 tbsp of honey
  • 1/2 cup grated parmesan cheese
  • 3/4 cup of olive oil
  • 2 tbsp of peanut butter
Mince the garlic and ginger in a food processor. Add the cilantro and process until finely chopped. Add spices, lime juice, vinegar, honey and cheese. Process until well mixed. Slowly pour the olive oil and let mix in the processor for 1 more minute. Finally, add the peanut butter, mix until everything is well blended. The dressing will be green and thick, but very delicious!

Add the dressing to your salad, mix well and serve! I served mine with some tortilla chips and salsa on the side and sparkling water ($.79 at Trader Joe's). Pretty quick and easy to make this meal and it is great as left overs too. 


Tuesday, July 2, 2013

4th of July Beer Brats and Truffle Fries

I love Wisconsin!

Really, I do.

Spending my college years in Madison, WI was the best decision I ever made. I learned so much about life in college, and a lot of those lessons came from the wonderful midwestern friends I made. If Wisconsin didn't have such harsh winters I'd probably still live there. Seriously though, the winters sucked. Try walking to class in a foot of snow and with a -15 windchill. Of all the years I spent there, we only had 1 snow day. Yes, one. And that was only because we got close to two feet of snow in less than 24hrs. We all went crazy that night, building giant snowballs to block all the roads leading up to campus, building army of snowmen to deter the snow plows from coming thru, and best of all, building giant snow penises in front of the Dean's office. Yup. That's my school. And those nights were always followed by the campus wide snowball fight and food tray sledding.  


Going to such an amazing university as the University of Wisconsin-Madison had its many perks. One of those perks was football season and tailgating. That's where I learned all about Miller Lite, cheese curds and beer brats. I blame the curds, brats and beer for the "freshman 15 (more like 22)"(I obviously did not drink 'till I was 21 mom).

So for this post, I am going to share my version of beer brats.. because I could never recreate the deliciousness from the annual Wisconsin Brat Fest while living in DC.


I don't eat pork very often, so I sometimes substitute pork brats with chicken sausages from Whole Foods. The sausages are delicious grilled, but they can't compare to the original beer brats. You can choose whichever type of sausage you want. If you live in Wisconsin, you will have many delicious options to choose from. If you're like me and are stuck in DC, I recommend the Johnsonville brand of brats. You can find them at most grocery stores.

Buy how ever many sausages you will need along with some cheap beer. I usually use Miller Lite. Boil the beer in a big pot, poke the sausages with a fork, and place them in the pot to boil. Let them cook in the pot for a few minutes until ready. I sometimes turn down the heat to slow cook the brats in beer for extra flavor. 

Once they are cooked, remove from the pot and bring them over to the grill to grill the outside of the brat. Some people choose not to cook the brats all the way in the pot of beer so as to not overcook them on the grill, but you're only toasting the outside of the brat for some of that grill/charcoal flavor. Once you have the outside golden, take them off the grill and let them cool a bit.


And start piling on the toppings!

An original brat will have some saurkraut and mustard on there and a nice glass of cold beer. I like to eat mine the Venezuelan way.. I top my brats with brown mustard, onions, parmesan cheese, a little bit of ketchup, and some potato chips or those little french fry type chips. I also spread a little mayo on the bun. And of course, I like having it with a beer too. I try to drink a little fancier beer with my meals now-a-days, well.. sometimes, so I normally drink some Goose Island, Sprecker's or Leinekugel's (summer shandy is my favorite).

For the home made french fries, I slice 5 russet potatoes (for 6 people) length wise into thin strips. I toss them in olive oil and place them on a lightly oiled pan and drizzle some truffle oil (you can find truffle oil at Whole Foods, World Market and even TJ Maxx). Pop it in the oven at 400 degrees for 30 min. Take them out, flip them, and pop them in for another 30 min. Some ovens may cook them faster or longer than that, that's how long they take to cook in my oven. Once they are done, I toss them in this truffle salt I found in the bulk section at Whole Foods. You only need to use a little bit, so don't worry about having to buy a big bulk of it.


Pretty easy, huh?

I am serving my 4th of July brats and fries on these cute baskets I just bought at Sur la Table for a $1.56 each. Wal Mart sells a pack of 4 for $5. The liner paper is also from Sur la Table, and that was on sale for $4.50 for a pack of 25. Cute and not too expensive, right? That's my kind of party for sure.


Happy 4th of July (week) everyone! I hope ya'll get some great weather for fireworks watching! I know I'll be watching fireworks over the Washington Monument this year. It is nice to live in DC sometimes =).

Wednesday, June 26, 2013

Kitchen Chalkboard

Hey Everyone!

It's time for another DIY project! Woop woop!

It's been a while since I've blogged about a DIY and I've been slowly but surely working on this particular project, not because it takes a long time, but because I am so scattered brain that it takes me a while to finish certain tasks.. haha. So, without further ado here it is....

Ta ta daaaa!! tadatadatada ta daaaaaaa!!

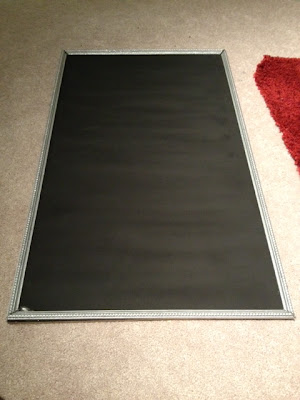
A chalkboard!


Pretty darn cute, huh? Best part? It cost lest than $20. Try buying a chalkboard for less than $20, it's just impossible. So I decided to make my own to hang in my kitchen. I've been wanting to re-do my kitchen "decor" to have more of a farmhouse feel but with a little glam, and since I rent, I can't really do much about the actual kitchen, I can only add things to make it look pretty, but I can't paint or replace the million different things I want to get rid of. Ugh.

So for my chalkboard I headed to Home Depot. After looking around for a while I found that they sell a pretty big slab of chalkboard for $10. I almost bought that and had them cut it down to the size I wanted, but I wanted something a little sturdier and I didn't know what I would do with the extra chalkboard. So I bought a piece of wood that was the perfect size (2x4) for $6. The particular wood I bought is one that is made as a base for drawers. So if you have some old drawers laying around, go ahead and pull out the sides and use that flat bottom part.


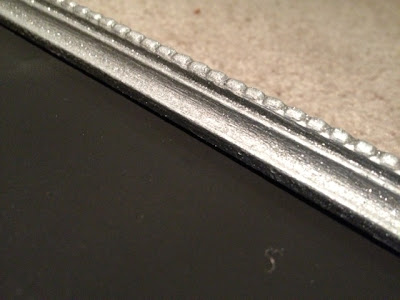
I also bought a spray can of chalkboard paint for $4 and these detailed wood borders for $2 each (I only needed 2 of them). The borders I sized and cut at Home Depot since they have the saws you can use for free at work stations in the wood section. I made sure to measure the length of the pieces I needed and cut at an angle, so when I would glue the borders to the chalkboard, the ends would fit like puzzle pieces and not overlap each other.

That process took a little bit of time, since the saws weren't perfect for cutting the border and I needed to carefully line up the edges to make sure each side would fit properly.

I also bought a can of metallic silver spray paint for $4, a bottle of Elmer's Wood Glue and some picture hanging brackets.

After I left Home Depot, I went home and cut up some old paper grocery bags to lay out as my work station on my balcony for spray painting. I then primed the wood with some primer paint I had and waited for it to dry before I began to spray paint the surface with the chalkboard paint. I probably did about 3 full coats of chalkboard paint just to ensure everything was covered. I carefully moved the chalkboard aside and laid out new paper bags for the border. I didn't want the fresh chalkboard paint on the bags to get on the border. I spray painted the borders with the metallic paint, no need to prime these,  and waited for that paint to dry as well.


I waited at least 24hrs for the spray paint to dry before I added a coat of Martha Stewart's glitter paint to the borders to give it a more glam look. After a few hours of drying, I went ahead and lined up the border on the chalkboard and began to glue it using Elmer's Wood Glue. I waited few hours for that to dry just to make sure everything was secured and began to measure the chalkboard to see where I would install the picture frame brackets.


The brackets were pretty straight forward to install. I just measured and screwed in the screws. I measured the board so that each side was at an equal distance from the center of the board, that way it hangs and holds firm and steady.


I haven't officially hung my chalkboard yet because I am having some repairs done in the kitchen. But I can't wait until the kitchen is ready so I can make full use of it and do some meal planning! 

Do you have a chalkboard? If so, what do you use it for?

Thursday, June 20, 2013

Saving My Container Garden

If you've been reading my blog the last few weeks you are probably already aware of the struggles I've been facing with my container garden. But for those of you that haven't (or can't remember) I was recently fighting a battle with aphids. A battle so tough, that I thought my garden was done for.

And I bought new pepper plants to replace the ones badly wounded.

But then my bf and I decided to take pictures and sample leaves to the "plant wizard" over at the Merrifield Garden Center in VA before calling it quits. We call him the plant wizard because he knows anything and everything about plants, and you can usually find him reading massive botanical books or looking under his microscope at what plants people have brought to him for advice. And I am so glad we visited him. The wizard told us that the plants not only were dealing with aphids, but also with some sort of fungal disease. So he directed us to some sprays we could use to try and save the plants. So for the last 3 weeks, I've been spraying my plants with Bonide spray. And my plants have come back to life.


Slowly but surely the plants are now growing new leaves and blooms. They look 10xs healthier than they did 3 weeks ago, and bigger too! Unfortunately the disease spread to the entire balcony garden, so I've had to spray my entire garden once a week and wait for the disease to be completely gone. I had some casualties with flowers that were overtaken by the disease and the tomato plants have struggled a little bit, but overall the garden is looking healthier and I am sure it will fully recover in another week or 2. The lemon tree was also affected by it, but it is pretty resilient, so other than not dropping fruit yet, it has managed fairly well.

Here are some pictures of the habanero plant and the tomatoes. You can see the damage the disease and aphids caused as well as the healthy new leaves growing in each plant. The San Marzano tomato plant dropped some fruit, but one of them has some sort of fungus growing on it. So I have to continue to spray all of the plants until I know they're good to go.


This is the Bonide spray I have been using. It works on fighting disease on the plants as well as aphids and other harmful insects. I was hoping to stay organic all season, but the organic sprays I was buying weren't working against the disease. So I had to give in and buy this. In the future though, I will be sure to spray all of my plants at the beginning of the season with organic spray if I can, as I now believe one of my plants had the disease prior to arrival at my garden and spread it to the rest.


On a happy note, that giant stick growing out of my pot that was supposed to be a blackberry, looks a lot more like a blackberry plant nowadays.


OOHH YEEAAAA!!

Call me the blackberry wizard.. haha jk.

But to end this post, I now have even more pepper plants than I know what to do with. 15 pepper plants total. I see a lot of pepper recipes in this blog's future. Just take a look at the pepper my banana pepper plant managed to drop despite the disease and aphids.. and it is still growing.


I am a happy gardener now =)

Monday, June 17, 2013

Veggie Pizza with Balsamic Glaze and Honey

Hi Everyone!

At this time of the year I would be very excited about the progress my container garden was making and blogging all about it, but this year has been quite the struggle. My plants have been fighting an aphid infestation and also a fungal disease. Needless to say, it hasn't been a good growing season. So to cheer myself up, I bought some fresh veggies at the farmer's market for some homemade pizza and popped in a movie and sat on my couch like a fatty eating pizza and ice cream. And it felt great. Until the next day, when I realized I ate over half a pint of Ben & Jerry's (damn you, brownie batter). Yikes.

Did my garden and I just break up?

Not really. I bought some organic fungicide and it has been helping my garden come back to life. I will write a post with all the details later this week. But I sure was sad enough to eat that much B&J in one sitting, so it sort of felt like a break up...

Although I did that again last night while watching the Miss USA pageant on TV. I was so intrigued by their answers to the final question. Actually, I was just shocked and embarrassed. It is sad that those are the women who are out there "representing" my gender and generation. What happened to our education system? Are those the type of people the system is pumping out? Because holy smokes, that's embarrassing. And don't get me started on the girls that clearly had an eating disorder. I am pretty sure I saw one contestant's entire skeletal system while she strutted in her bikini. There's a difference between being lean, healthy or skinny and just plain sick. I should send her all the B&J I have in my freezer.

Speaking of eating, here is my awesome pizza recipe for this week. It is a veggie pizza with balsamic glaze and honey. I added my favorite vegetables, but you could add whatever vegetables you'd like.

1 store bought pre-made pizza dough (I buy Trader Joe's pizza dough or sometimes Whole Foods)
1-2 eggplants, sliced
1 bottle of pizza sauce (whatever brand you like works great. I use Trader Joe's)
Shredded Mozzarella and Pecorino cheese
1 container of black olives, halves
1 container of artichokes, cut into small pieces
1 bag of sundried tomatoes
1 red pepper, sliced
honey
balsamic glaze

Preheat the oven to 425 degrees. I then rolled out the dough to fit the size of my pizza stone. I add a little semolina flour to the pizza stone to help the pizza slide much easier. Once the dough is stretched, I add as much pizza sauce as I want. I don't use an entire container of sauce, but if you like very saucy pizzas go for it! Although you will want to make sure that the fillings don't spill out to the sides of the dough. I then add the cheese followed by all of the veggies except for the sundried tomatoes. Depending on the size of your pizza, you might need more or less veggies. My pizza was enough for 2 people with plenty of left overs. Cook the pizza for about 20min or until the dough is crispy.


I add the sundried tomatoes once the pizza is done and out of the oven. I tried cooking the pizza with the sundried tomatoes and they actually ended up getting burnt. I also then drizzle balsamic glaze and honey on the pizza, let cool a little bit, and serve.


I like to drink sparkling lemon water from Trader Joe's with my pizza. It is such a good deal, you can buy a bottle for $.79. At Whole Foods, it is $2.14 for some lemon flavored sparkling water! I like the orange flavor too, those two are my favorite. Definitely give them a try if you live close to a TJs.

Anyone else have any good pizza recipes?